Tutorial
When you launch Vem, you are welcomed with an extremely minimalistic interface: no toolbars, no buttons and no menus. Just the editing area and two special lines at the bottom.
Vem is a member of the Vi family and it is built on top of Vim. As such, Vem is a modal editor. That means that you can decide at any time if you want to use the keyboard to insert text (which is know as insert mode) or to execute commands (known as command or normal mode).
This tutorial will guide you through how to use these modes and describe the most frequently used commands. If you are already familiar with Vim, it will also explain many of the differences between both.
If you're interested in a description of the complete set of commands, check the User's Guide out instead.
Starting Vem
You can start Vem by running the following command in a terminal:
vem [filename]
This will start Vem using Vim as the underlying editor. You can also use the nvem and gvem commands to start Vem using either Neovim or the graphical version of Vim respectively. Which one to use is mostly a question of personal preference. Vem works almost identically in all of them.
Of course, this requires either Vim or Neovim to be installed in the system, if that's not the case check the Download for more information.
Vim has funnily become a traditional trap for first time users which struggle to find their way out of the editor. Let's cover that first. To exit Vem, just press the x key:
- x:
close file (and exit Vem if it is the last open one)
Modes: a short explanation
Vem is intended to be used using just the keyboard. To be able to define all the actions that can be performed, Vem, like Vim, relies on modes. If you haven't used a modal editor before, just think of it as an editor in which the keyboard can be used in two different ways: you can use it to insert text —like you would do in most editors— or you can use it as a sort of control panel where each key performs an action. Each one of these two options is known as a mode and you can switch from one to another at any time.
The names of these two main modes are:
Insert mode: characters get inserted into the text as you type (except Ctrl-<key> combinations, which perform actions).
Command mode: each key press performs a different action. This applies to both lowercase and uppercase letters, symbols and Ctrl-<key> combinations. (For example, as we saw before, pressing x closes the current file and exits Vem if it is the last one). Command mode is most commonly referred to as Normal mode.
There are other modes, but these two are the most important ones. Being able to insert text and switch back to normal mode at any time allows you to have a large number of commands/actions available at your fingertips. Although it may take some days to get used to it at first, switching modes allows you to be extremely precise and fast when you develop some muscle memory. You can, quite literally, perform actions at the same speed that you type.
The basics
So far so good, but you may be wondering how to actually use Vem. Let's jump straight into it.
Let's create a new file with:
vem my-new-file.txt
Vem starts in normal mode. That means that any key we press now will execute a command. Let's take a look at our first set of them:
- i:
start insert mode (left of current character)
- o:
start insert mode (right of current character)
- Ctrl-o:
go back to normal mode
- s:
save
- x:
close (and exit if it is the last document)
So now you can press i, which will start insert mode and allow you to enter any text. When you're satisfied with your brand new document, you can go back to normal mode using Ctrl-o and save your document with s (if you didn't provide a filename in the command line when launching Vem, you'll be prompted for one).
You can switch between insert mode and normal mode any time you need. And if you make any mistake you can undo/redo changes with:
- q:
undo
- Q:
redo
- q:
undo
- Q:
redo
- a:
undo
- A:
redo
Finally, you can close the current document and exit Vem with x.
With just those commands you can already edit any file, however, they they are only the beginning. There are many more. This is how the most important ones are distributed across the keyboard:
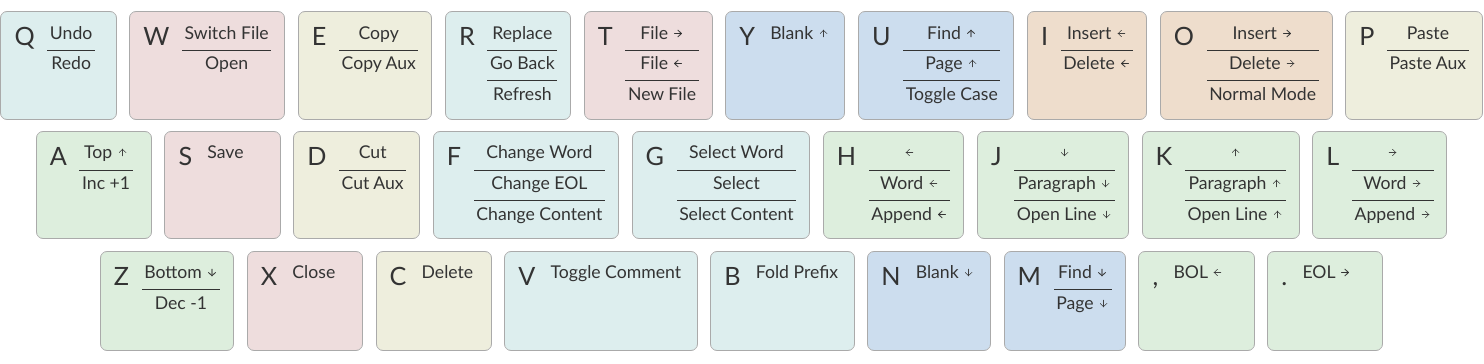
If you take a look at that chart, you may notice that actions are not associated to the letters of the keyboard using mnemonics. That is because, in Vem, commands are distributed spatially so that related actions are clustered together and to make frequent commands to be in more convenient locations.
Looking at all those commands at once may be a bit overwhelming if you haven't used a modal text editor before, but don't worry, remembering them and their positions is actually pretty easy. Also, the meaning of some of them may not look very clear yet, but they are pretty straightforward and this tutorial will try to cover all them.
Moving around
Basic movements
You can use Vim's traditional movement keys, hjkl, to move the cursor:
h
←
j
↓
k
↑
l
→
They move the cursor in the same way that arrow keys do. Many newcomers to Vim/Vem find difficult to get used to them at first since the don't look very intuitive. It requires some initial effort to get familiar with them but it is very important to do it, mainly for two reasons: first, to move the cursor, you don't have to take your hands away from the home row of the keyboard and, second, many other actions in Vem are placed in the keyboard according to these movements (remember that Vem distributes commands in a spatial way across the keyboard). In sum, using these keys is part of an efficient use of Vem.
For example, the uppercase version of these letters just performs a larger movement in the same direction:
Previous paragraph
(previous blank line)
K
↑
H
Previous word
←
∙
→
L
Next word
↓
J
Next paragraph
(next blank line)
And you can also use them modified with Ctrl to start insert mode at the left, right, above and below the current line:
Insert at new line above cursor
Ctrl-k
↑
Ctrl-h
Insert at start of line
←
∙
→
Ctrl-l
Insert at end of line
↓
Ctrl-j
Insert at new line below cursor
Other horizontal movements
These are movements that you can use to move inside the current line:
- 0:
move to first column
- ,:
move to start (first non-blank character)
- .:
move to end
- 0:
move to first column of current line
- ,:
move to beginning of current line (first non-blank character)
- .:
move to end of current line
- 0:
move to first column of current line
- ,:
move to beginning of current line (first non-blank character)
- ;:
move to end of current line
Other vertical movements
These movements will perform larger jumps up and down the current document:
- U:
page up
- M:
page down
- a:
move to the top of the file
- z:
move to the bottom of the file
- U:
page up
- M:
page down
- a:
move to the top of the file
- y:
move to the bottom of the file
- U:
page up
- M:
page down
- q:
move to the top of the file
- w:
move to the bottom of the file
Going back
You can make the cursor go back to the location it was before a jump with:
- R:
jump back. Pressing it multiple times takes the cursor through the jump history, making it visit all the locations in the current file you have jumped to sequentially.
For example, you could jump to the beginning of a source code file, add some import/include/require statement and go back to the initial location by pressing R to continue editing where you were previously.
Selecting text and using the clipboard
Selecting text is different than in many conventional text editors because there are three kinds of selections:
Characterwise selection is the most common selection type in many other editors, and it is defined between two arbitrary characters in the document:
Programs must be written for people to read,
and only incidentally for machines to execute.
To start a characterwise selection, press G and perform any horizontal movement (eg. h, l, H, L, ., ...).
Linewise selection is used to select full lines independently of the position of the cursor. It is very useful when working with code as you can work with blocks of lines very quickly:
Programs must be written for people to read,
and only incidentally for machines to execute.
To make a linewise selection, press G and perform any vertical movement (eg. j, k, J, K, U, M, ...).
Blockwise selection is used to define an arbitrary square of text in the document and it is commonly used to perform advanced edits over multiple lines:
Programs must be written for people to read,
and only incidentally for machines to execute.
To start a blockwise selection press G G (twice).
To know in which selection mode you are at any given moment, you can look at the status line at the bottom of the screen. There the mode indicator will state Visual for characterwise selections, V-Line for linewise selections and B-Line for blockwise selections.
Deselecting and Reselecting
To stop a selection and go back to normal mode and to reselect the latest selected text use:
- Space:
(in visual mode) deselect
- Space Space:
(in normal mode) reselect
Quick selections
While you can create any arbitrary selection using G and movement actions, in practice it is very common to select specific text objects. For those, you can use the following shortcuts:
- g:
select word
- g g:
like g but for all characters surrounded by white space under the cursor (including parenthesis, brackets and punctuation)
- Ctrl-g:
select text between enclosing quotes, parenthesis or brackets. Repeated presses to Ctrl-g expands the selection to the next enclosing pair of quotes, parenthesis or brackets.
- Space a:
select all
- Space p:
select current paragraph
There are many more selecting actions. Take a look at the Selecting section for a complete list.
Using the clipboard
Now that you know how to define a selection, it is a good moment to learn how to use the clipboard. Some basic actions that you can perform over a selection are:
- e:
copy
- d:
cut
- c:
delete
- p:
paste
As you can see, Vem does not use the common Ctrl-x, Ctrl-c and Ctrl-v shortcuts. This is on purpose, and although it may feel strange not to use them at first, after a bit of practice you'll notice how fast and comfortable are Vem's mappings in comparison.
Another thing to take into account is that p behaves differently depending on the kind of selection that was copied or cut. For example, if you have a linewise selection, lines will be pasted entirely without altering the existing ones (you don't have to open space for them). Characterwise selections behave closer to how they do in other text editors.
Using the secondary clipboard
Vem has two clipboards. The main clipboard (accessed with e, d and p) is connected to the system one so you can copy and paste information from/to other applications. The secondary clipboard allows you to have an additional piece of text in memory without overwriting whatever you have in the main one. You can access it with:
- E:
copy (secondary clipboard)
- D:
cut (secondary clipboard)
- P:
paste (secondary clipboard)
Directional paste
Unlike other editors, Vem pastes content after the cursor by default (both for characterwise and linewise selections). To paste before the cursor you can use:
- Ctrl-p h:
paste to the left of the cursor
- Ctrl-p k:
paste above the cursor
Deleting text
You don't need to switch to insert mode to be able to delete text. Most of the time this is something you can do quicker from normal mode.
The basic actions to delete text are:
- I:
delete character to the left of the cursor (ie. backspace)
- O:
delete character to the right of the cursor (ie. delete)
And, as you saw in the previous section:
- c:
delete line or selection (if one active)
Changing text
In other cases, you may want to delete some text and start insert mode immediately after (what it is known as changing in Vim terms). In the same way that the g key allows to perform quick selections, f allows you to to perform quick changes:
- f:
delete word under cursor and start insert mode
- F:
delete from cursor to the end of line and start insert mode
- Ctrl-f:
delete text between next enclosing quotes, parenthesis or brackets and start insert mode
Command line
When you perform a search or when you get prompted by Vem about writing the unsaved changes, the last line of Vem's interface is used. This last line is special and it is known as the command line. Apart from providing search terms and answering prompts, you can use it to execute commands. These are known as ex-commands and there's a large amount of them available in Vim. There's nothing specific in Vem about the command line and any information that you find about commands in Vim is valid for Vem too.
To use the command line, press colon. Then enter the command and then press Enter to execute it:
- ::
start typing a command
For example:
:sort
will sort all the lines of your document alphabetically. (Use :sort! to do the same but in descending order).
A very useful command is :s[ubstitute] to search and replace text in your document:
:%s/search parttern/replacement text/g
Here % stands for the whole document. You can also pass a range of lines instead. Eg :145,160s/foo/bar/. And g stands for replace all occurrences in the same line, not only the first one. We'll see a bit more of the command line in a section below.
You can also use the command line to jump to a specific line in the document. For example:
:203
will jump to that line number.
Once you execute a command in the command line, you'll be back to normal mode.
Searching
To search inside a document use:
- / or -:
start search
When you start a search, the cursor will be placed in the command line and you'll be able to type your search term:
Matches in the text will be highlighted as you type and, when you press Enter, the cursor will be placed in the first occurrence after its position.
Once you're back to the text you can jump to other matches:
- m:
find next occurrence of latest search
- u:
find previous occurrence of latest search
Or you can reset the highlighting when you don't need it anymore:
- Ctrl-r:
remove highlighting of occurrences of the last search term
Some relevant facts to note are:
You can use regular expressions in your search (see the Searching and replacing section for more information about the syntax).
Searches are case sensitive by default. To make case insensitive search, prefix your term with \c. For example:
/\cfoowill match both Foo and FOO.
To search in the reverse direction (from the current cursor position to the beginning of the document), you can use ? instead of / or -.
Searching the word under cursor
Sometimes, you just want to find the next occurrence of a term that is already present in the document. In those cases, just place the cursor on top of the word to search and use:
- _:
search occurrences of the word under the cursor
Status line
By now, you probably have noticed that the line just on top of the command line shows the current active mode and the path of the file you're editing. That is the statusline:

In addition, it provides other pieces of information. For instance, the cursor position is displayed at the far right with the format:
<line>:<column> <percentage>
where percentage is the percentage of progress within the document.
Also, there are the three pieces of information that are not immediately obvious in a text file just by looking at it but that define how it is internally formatted:
Indentation type and size (tabs or spaces)
File enconding (eg. utf-8, latin-1 or cp1251)
Newline type (Unix: LF, Windows: CRLF, Mac pre-OSX: CR)
Working with multiple files
In our examples so far, we have been operating with a single file. Vem offers, though, several commands to work very efficiently with multiple of them.
The basic commands to open, save and close files are:
- W:
open file
- s:
save file
- x:
close file (and exit Vem if it is the last one)
- W:
open file
- s:
save file
- x:
close file (and exit Vem if it is the last one)
- Z:
open file
- s:
save file
- x:
close file (and exit Vem if it is the last one)
Using the file browser
When you indicate that you want to open a file, a file browser is displayed:
As you can see, the file browser is very minimalistic and uses the same window where you edit your files. Don't let this simple appearance mislead you: while the functionality is very basic —pretty much just opening files— it is extremely fast to use, in particular because you can use any movement key that you use when editing files.
There are two movement keys that change their behavior when used inside the file browser though:
- h:
go to parent directory
- l:
open the file under the cursor (if the cursor is over a directory, the directory contents are displayed instead)
Other than that you can go up and down, jump to the top or the bottom of the list or search inside it using the same keys that you would use normally. When you find the file you want to open just press l or Enter.
A couple of additional commands that are very useful inside the file browser are:
- Ctrl-h:
toggle the display of hidden files on / off
- Ctrl-r:
refresh content
To leave the file browser without opening a file, use:
- x:
close file browser
Creating a new file
You can create a new file with:
- Ctrl-t:
new file
When a new file is created it doesn't have a name nor it is saved on disk. When you press s to save for the first time you will be prompted for its filename.
Switching files
When there are multiple open files in the editor, the tabline —a line at the top showing all their names— is displayed, and the current file is highlighted:

To switch from one file to another you can use:
- t:
next file
- T:
previous file
Or you can directly jump to a particular file by pressing:
- w:
switch buffer
- w:
switch buffer
- z:
switch buffer
When you do so, a new prompt and a list of results appear at the bottom of the editor. That is the fuzzy finder and it allows you to type the name of the file that you want to jump to:

The fuzzy finder allows you to type a few characters that can be found anywhere in the filename and will show the files that match your input characters in the top list. The characters don't have to necessarily be at the beginning of the filename nor be consecutive.
Once the filename you're looking for is highlighted in the top list of results, you can press Enter to switch to it.
If the file you're looking for is already being shown in the result list you can select it by using the following key mappings before pressing Enter:
- Ctrl-k:
move up the result list in fuzzy finder
- Ctrl-j:
move down the result list in fuzzy finder
This system works specially well when you have many open files because jumping from one to another just requires a few keystrokes.
To close the fuzzy finder without switching from the current file, use Ctrl-o or Esc.
Saving and closing all files
Finally, you may want to save all unsaved files or just close all files (and effectively leaving Vem). You can do so with:
- Space s:
save all
- Space x:
close all (exit Vem)
To execute them, you first have to press Space and then s or x in sequence.
Working with code
The following actions are extremely common when working with code:
Indenting
To indent or unindent the current selection, or just the current line if there's no selection active, use:
- Tab:
indent current line or selection
- Shift-Tab:
unindent current line or selection
Commenting
You can comment pieces of code out with v. If there's a visual selection, then all the lines in the visual selection are commented out. If there's no visual selection then only the current line will be commented out:
- v:
comment and uncomment code (line comment symbols)
v acts as a toggle key so it can be used to both comment and uncomment code. If the lines in a selection are already commented out, v will remove all the comment symbols and, conversely, it will comment out all lines if they are not like that already.
To use block comment symbols, instead of line comment ones, use V:
- V:
comment and uncomment code (block comment symbols)
The editor is able to automatically use the correct comment symbols for most common, and not so common, programming languages and markup files. However, if your file comment symbols are not detected correctly, take a look at the Comments section for possible solutions.
Doing things fast
So far we have seen many commands that can already help you to be very efficient while you edit text. However, you may have already noticed that switching modes for small edits can be annoying. For example, if you want to correct a single character, you need to press i or o, delete the character, type the new one and press Ctrl-o to go back to normal mode. That's way too many key presses for such a simple change.
This section list commands that make small edits much easier to do and, therefore, provide a much smoother editing experience.
Replacing characters
Sometimes you need to change just a single character by another one. In those cases, you can just press r, when the cursor is over the character to be replaced, followed by the new one:
- r{char}:
replace the character under the cursor with char. If there's a visual selection active, all the characters in the selection are replaced by char.
Toggle case
You can toggle the case of a character or a selection without leaving normal mode with:
- Ctrl-u:
toggle case (lowercase/uppercase) of the character under the cursor or the text in the currently active selection.
Adding whitespace
You can add a blank space both in front or after the cursor (like pressing Space in insert mode) with:
- (:
add a space to the left of the cursor
- ):
add a space to the right of the cursor
And you can also add blank lines both above and under the cursor too:
- y:
add a blank line over the cursor
- n:
add a blank line below the cursor
- z:
add a blank line over the cursor
- n:
add a blank line below the cursor
- y:
add a blank line over the cursor
- n:
add a blank line below the cursor
Joining/Splitting lines
- &:
join the next line with the current one (removes the line break). If there's a visual selection active, join all the lines in the selection.
- |:
introduce line breaks in a line or selection to adjust the text to a maximum width. This maximum with is equal to the value of the textwidth option if it is not set to zero. Otherwise, it is set to 79 characters (or to the screen width, if the editor screen is smaller than that number).
The commands to join and split lines are specially useful when editing regular text (as opposed to code).
Adding/Substracting units to numbers
- A:
add 1 to the number under the cursor
- Z:
subtract 1 from the number under the cursor
- A:
add 1 to the number under the cursor
- Y:
subtract 1 from the number under the cursor
- Q:
add 1 to the number under the cursor
- W:
subtract 1 from the number under the cursor
Solving problems and getting help
Unintended changes
It can happen —specially when learning Vem, but also later too— that you mistakenly press a different key than the one you really intended to use. Since every key has an associated action, you may end up in an unexpected place of your document or modifying it in an unintentional way.
If this happens, just jump back to where you were or undo the latest action with:
- q:
undo last change
- R:
jump to previous position
q undoes the last change and jumps back too, so you can use that one to ensure that you didn't modify anything by mistake and if the latest change was correct you can just redo it with Q.
In any case, you can also check the timestamps of the latest changes to see, at any time, when the last change to the document happened:
:undolist
Getting help
You can get help about any topic using the command line. Just type:
:help <topic>
With Tab you can autocomplete the topic string.
You can use the help command to find more information about configuration options, commands or mappings. For example, you can get more information about the :sort ex-command with:
:help :sort
After executing this command, the screen will be split showing your current document and a new window displaying the contents of help. You can move in this window using the same movement keys as in the rest of the editor. In addition, you can:
jump to a topic by placing the cursor on top of a highlighted term and pressing Space o
jump back to the previous topic with Space i
close the window with x
Next steps
This tutorial contains all the information needed so you can use Vem proficiently. However, there are many more Vem key commands that leverage the many features of Vim. For example, you can split the working area of the editor in different windows, record repetitive actions using macros or setting marks within your documents to jump quickly to.
To check these and many more actions, you can take a look at the User's Guide, which contains the full explanation of all Vem's commands.
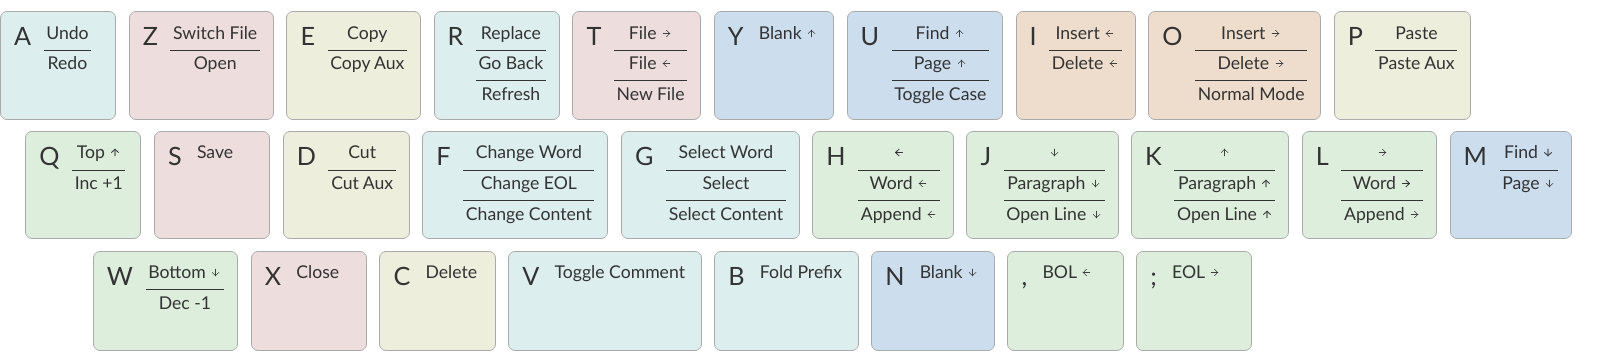
If you want just a quick summary of the available actions, you can use one of the available cheat sheets instead:
The basic sheet contains the commands described in this tutorial, the full version contains all available ones.